By Bill Palmisano
Composting with worms produces a consistently superior product called vermicompost, which contains high counts of beneficial soil micro-organisms.
Harvesting the finished vermicompost from most worm bins presents a problem, though: one either stops feeding a significant part of the bin to take it out of production, encouraging the worms to vacate the area to be harvested, or the worms have to be physically separated from the finished compost.
The Continuous-Flow Worm Bin
Continuous-flow worm bins are designed to provide a continuous output of finished vermicompost without disturbing the worms or taking any part of the bin out of production. This design makes it much easier to harvest the finished compost. Most continuous-flow designs have a winch-powered knife that cuts a slice of finished compost from the bottom of the bin about 2’ above the ground.
There is a passive self-harvesting non-mechanical continuous-flow design that is simple to use, though. This elegant design is used at the Open Alternative School (OAS), a public elementary school in the Santa Barbara Unified School District in California. The bins are fed with food scraps, paper and cardboard. They produce rich compost that is then used in the school’s large organic garden. This design can also be adapted to compost animal manure.

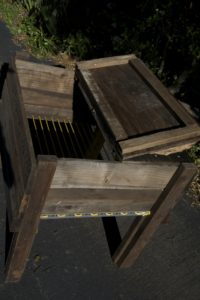
A finished continuous-flow worm bin
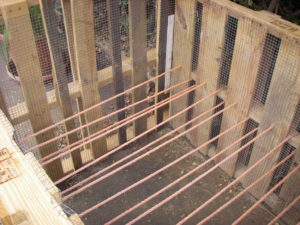
Continuous-flow boxes receive air from the top and bottom of the pile. This provides the aerobic conditions that worms need in order to thrive. This design makes it difficult for anaerobic (low/no-oxygen) conditions to develop. Excess water cannot collect at the bottom of the box to become anaerobic because excess water drains through the ropes. The finished compost also drops through the spaces between the ropes and falls to the ground for collection.
In my experience, students are universally fascinated by the incredible variety and vibrancy of the organisms found in a healthy worm bin. Schools can provide a steady supply of feed materials for bedding such as uneaten food, kitchen waste, paper and cardboard. Students watch as the worms facilitate the decomposition of food to produce vermicompost.
The worm bins at OAS provide a tremendous volume of nutrient-boosting vermicompost that is full of soil organisms. The compost inoculates the soil and ensures the success of the school’s garden and orchard. The only downside we’ve found to the use of vermicompost is that tomato seeds sometimes sprout out of it; these are easy to identify and weed out, though.
The two worm bins at OAS that process food waste are located in a shady 60-year-old redwood lath house. The bins have a total surface area of 90 square feet. This is enough to process more than 50 gallons of food waste a week.

A finished continuous-flow worm bin
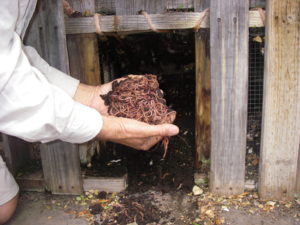
A thin layer of food waste is spread on the surface of the box and covered with shredded office paper, torn newspaper and/or sliced, pre-wetted cardboard. Microbes begin and worms finish the digestion of the food and paper, producing dark, humus-rich vermicompost. The boxes are raised about 18” to 24” inches off the ground. The bottom of the box is made of closely spaced parallel ropes, through which the finished compost falls down to the floor. When enough compost has accumulated, it is simply raked out and used in the garden or bagged up for fundraising sales.
This worm bin design was discovered in the late 1990s in an article in the now-defunct Worm Digest. An organization called Berkeley Worms originally constructed two dozen 4’x8’ continuous-flow worm bins at the Berkeley Transfer Station that were made out of recycled lumber, using rope as the bottom layer of the boxes.

These were used for about five years until the wooden frames rotted and the boxes began to fall apart. The current design replaces the wood with a steel frame. The bottom of the box is now polypropylene rope strung parallel at 2” intervals across a galvanized or epoxy-painted steel frame.
The first steel-framed bin we constructed has been making vermicompost for 17 years and shows little sign of wear or decomposition (except for the lids, which wear out and need to be replaced every few years).
The 2” x 12” wooden sides that contain the worms, food waste, paper, cardboard and compost sit directly on top of the steel frame on which the ropes are strung. The box lids are made of 1⁄2” exterior plywood, with a stiffening lumber frame screwed to the plywood’s perimeter that fits snugly to the 2” x 12” wooden sides in order to exclude rodents.
All About Compost Worms
The worms used in our bins (Eisenia fetida) are known as redworms, manure worms, litter worms or red wigglers. They are not earthworms. In their natural habitat, Eisenia fetida do not build tunnels in the mineral soil like earthworms. They remain in the upper litter layer, where they help decompose plant and animal detritus.
Food decomposition in a worm bin begins when microbes start to grow on the surface of the food waste, paper, or cardboard. Worms slither along the surface and use their mouths to suck up this microbial growth. The microbial food passes through the worm’s pharynx and esophagus to the crop, where is it is temporarily stored. It then moves to the worm’s gizzard, where strong muscles, aided by small pieces of sand, crush the microbes and release their internal juices. This soupy mix passes to the worm’s intestines, where the gut extracts the nutrients the worm needs and the remainder is processed and then excreted as worm castings.
Worms require wetter composting conditions than the optimal 50% moisture level of a thermophilic (hot) compost pile. Worms demand aerobic (presence of oxygen) conditions and 80% or greater moisture in order to properly diffuse oxygen through their skin.
Managing Worm Bin Temperature
Redworms are the only vermiculturing beast I’ve worked with, and they have very specific environmental parameters. I stress the need for high-moisture conditions and the requirement for an oxygen-rich environment. They also demand a specific temperature range: under 40°F (4.4°C) or over 90°F (32.2°C) and they start to die off. They don’t work very fast until the temperature is above 60°F (15.5°C) and seem the most active at about 80°F (26.7°C). Keeping an active worm box warm in all but the coldest temperatures is possible because of the metabolic heat produced by the active decomposition. Lids must be kept closed tightly when it is cold.


Compost should reach a temperature between 135°F and 155°F
In very cold conditions the box needs insulation to keep the temperature at an acceptable level; a seed tray heating mat can be placed in the box if it is extremely cold. One must keep feeding the worms as necessary. It can be a challenge, however, to keep them cool in hot weather.
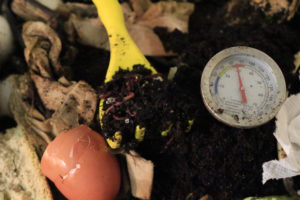
Food waste is a high-nitrogen feed source and will heat up when decomposing—protein and calorie-dense foods more so than whole fruits and vegetables. Monitoring the box temperature with a thermometer is helpful in warm conditions. Adding food to a box that is over 80°F can lead to catastrophe when the ambient temperature is already warm.

It is disheartening to open the lid of an overheated worm box and smell the unmistakably putrid odor of dead worms. However, there are strategies to deal with the heat. Do not feed the worms if the box temperature is over 80°F. Provide shade from the sun for the bin in hot weather. If a shady location is not available, stapling a layer of Tyvek (a weather-durable, white, moisture barrier ) to the lid and sun-exposed sides of the bin will provide some protection from solar heating.
It is also important to feed the worms thinner layers of food. Another hot-weather strategy is to feed in shallow rows or piles with larger “fallow” areas adjacent for the worms to escape into if the food areas get too hot. Also helpful is adding more carbon bedding waste: straw, shredded paper and/or wetted cardboard.
One can increase air circulation by propping the lid open or leaving an air vent space between removable lids (but beware of rodents). Or one can use a fan to blow air over the surface of the bin.
Air circulation in hot weather is key. Evaporating water can cool the contents of the bin. Remember to add water to keep the moisture level up. Hot air temperatures coupled with high humidity are the most challenging of conditions. In extreme cases, ice can be dumped on the surface of a bin that is overheating. In hot and muggy conditions, wetted corrugated cardboard may be the dominant feed source to prevent overheating.
How to Keep Your Worm Bin Pest-Free
The entire worm bin needs to be sealed off from rodents and other animals. The warm, cornucopia environs of a worm bin are irresistible to rats and mice. Removing a mouse or rat nest from your bin can be a daunting project, so it is extremely important to prevent them from getting in.
In our design, the plywood lids have a lumber-frame lip that overlaps the top of the box with less than a 1/4” gap. 1/4” hardware cloth encloses the compost collection space under the box.
I use 1/4” because I have found that small mice are able to squeeze through the 1/2” hardware cloth. For harvesting, 1/2” plywood panels slide up and down in snug channels formed by 2” x 2” lumber, the channel lumber being screwed to the bin’s support posts (no hardware cloth needed here).

The complete exclusion of animals from your bin must include some type of paving that the bin rests on. Access doors and hardware cloth must remain in flush contact with the pavement. It is a good idea to periodically inspect for digging, gnawing, or access points on the bin’s exterior (including the lids). Act promptly if you see signs of rodents digging inside the box. They usually leave evidence of their visits with round holes, tunnels and debris piles on the surface of the box’s contents. Look for access areas around the exterior of the bin and seal the entry spot as soon as possible with hardware cloth, lumber or bricks. In my experience there is usually a week or two following the initial feeding visits by a rodent before the subsequent building of a permanent rodent nest inside the bin.
Another benefit of having a paved surface under the bin is that it makes harvesting the finished compost easier. Simply rake it out! However, you don’t want to let it pile up for too long. I have never had any finished compost get smelly and anaerobic, but if it builds up for more than a year I have seen it produce a mild, very short-lived odor when finally harvested.
If there is a perennial vine, shrub or tree nearby you may need to guard against root invasion of your finished product. I once built a bin on an asphalt driveway adjacent to a cape honeysuckle vine. The compost built up for a few months, and when I went to rake it out my rake stuck in the compost and would not move. The entire pile of compost under the ropes was permeated with fibrous roots that had entered the finished compost from cracks in the asphalt. I rebuilt the bin in a slightly different location with two layers of thick, matted root-blocking weed cloth covered with concrete pavers on top of the asphalt.
Bedding Materials
Cut-up cardboard produce boxes make excellent bedding and covering material; be sure to slice them into strips for faster breakdown and water penetration. Waxed produce boxes cannot be recycled, but can be given to worms. The waxes are food grade and do compost, plus they feed fungus, which is a desirable organism in your compost.
I once had the chore of moving a large worm bin that had been in production for six years. Disassembly was the only option because it could not fit through the door intact. I was stunned by the amount of plastic and aluminum foil debris that had accumulated on the ropes at the bottom of the box, even though I had been careful to pick the trash out of the food waste that I fed into it. Of note were plastic ghosts from paper cups and plates. Most paper cups have plastic film bonded to the paper, as do some paper plates.
Try tearing paper cups and plates before putting them in the worm box. If they tear cleanly and easily, they do not have a plastic coating. Also, compostable cutlery and compostable plastic containers are anything but compostable in a worm bin. Remember to remove plastic tape from cardboard boxes.
Vermicompost is pathogen-free. Our school district is very leery of garden composting because of the possibility of contamination with pathogens when not done properly. However, they have no problem with vermicompost, because all pathogens that traverse the worm’s gut are destroyed, as are all pathogens that come in contact with the secretions on a worm’s skin. Between the worms’ gut and skin there is no chance for a pathogen to survive the vermicomposting process, so worm boxes are the ideal partners for school food-waste composting.
In conclusion, this particular worm bin design is slightly more complicated to build than a standard worm bin, but the generous output of compost, large worm populations and ease of harvesting more than make up for it.
Editor’s Note: This article appeared in the March 2018 issue of Acres U.S.A.


